
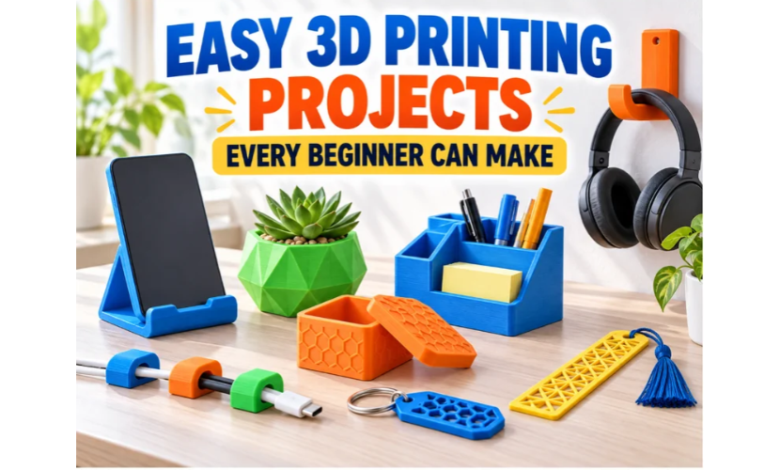
Owning a 3D printer opens the door to hundreds of creative possibilities, but the first project can be surprisingly difficult to choose. A highly detailed figure may look exciting, yet it can require supports, careful orientation and hours of printing. A large functional part may consume an entire spool before you know whether your settings are correct.
The best beginner projects are usually smaller, faster and forgiving enough to succeed with standard settings. They help you learn one practical skill at a time without wasting much filament when something goes wrong.
The projects below are easy to print, useful in everyday life and adaptable as your skills improve. Most work well with PLA and a standard 0.4 mm nozzle, making them suitable for a first week of printing.
What Makes a Good Beginner 3D Printing Project?
A beginner-friendly model should have a stable base, limited overhangs and relatively simple geometry. Ideally, it should print without supports and finish within a few hours. These qualities make it easier to separate problems with the model from problems with the printer.
Small projects are especially useful because they provide quick feedback. If the first layer is too high, the corners lift or the dimensions are inaccurate, you can make an adjustment and try again without losing an entire day.
Before downloading a file, check the model description for its dimensions, recommended layer height and support requirements. User photos and comments are also useful because they show how the design performs outside the original creator’s setup.
If you need more inspiration before choosing a model, collections of 3d printing ideas for beginners can help you compare practical objects, decorations and skill-building prints.
Calibration Cube
A calibration cube may not be the most exciting object on the list, but it is one of the most useful first prints. The typical cube measures 20 mm on each side and includes letters indicating the X, Y and Z axes.
Once printed, measure each side with digital calipers. Small differences reveal whether the printer is producing accurate dimensions. The cube also gives you a quick look at first-layer quality, corner sharpness, wall consistency and the smoothness of the top surface.
Keep your first cube rather than throwing it away. After making adjustments, print another and compare the two. The visible improvement provides a practical record of what each setting changed.
Personalized Keychain
A keychain is small, quick to print and easy to customize. You can add a name, initials, short message or simple icon without creating a complicated model.
This project introduces basic design skills such as adding raised or recessed text. It also teaches an important lesson about minimum feature size. Letters that look clear on a computer screen may become difficult to read when they are narrower than the printer can reproduce.
For good results, use a bold font and avoid extremely small text. Print the keychain flat on the build plate and add a few solid top layers so the upper surface looks clean. Once the basic version works, experiment with a color change to make the lettering stand out.
Phone Stand
A simple phone stand is an excellent first functional print. It demonstrates how wall thickness, print orientation and object geometry work together to support weight.
Choose a one-piece design with a wide base and no moving joints. Check that the slot is wide enough for your phone, especially if you use a protective case. Some models also include a channel for a charging cable.
PLA is generally suitable for a desk stand, while PETG may be a better option if the stand will be used in a warmer environment. Avoid leaving PLA accessories in a hot vehicle, where elevated temperatures may cause them to soften or deform.
Cable Clips and Organizers
Cable clips are among the easiest useful objects to print. They require very little material, often print in less than an hour and can immediately improve a cluttered desk.
Start with an open clip or simple cable channel rather than a design with a thin moving hinge. Measure the cable diameter before selecting or scaling the model. A clip designed for a charging cable may not fit a thicker power cord.
Because these objects are small, printing several at once can be efficient. However, test one clip first. Once you know that the size and flexibility are correct, duplicate it in the slicer and fill the build plate.
Plant Pot or Succulent Planter
A small planter combines simple printing with plenty of room for creativity. Cylindrical and low-poly designs are usually straightforward, while decorative textures allow you to see how the printer handles repeated surface details.
Select a model with drainage holes or add them before slicing. Remember that ordinary prints are not always completely watertight because tiny gaps can remain between layers. A removable inner nursery pot is a practical way to protect the printed planter and nearby furniture.
This project is also useful for testing vase mode, which prints a continuous outer wall in a spiral. Vase-mode objects are fast and visually smooth, although their thin walls make them better for decoration than heavy-duty use.
Desk Organizer
A small tray or pen holder teaches you how to print larger flat surfaces. It can also reveal bed adhesion issues that may not appear on a tiny calibration model.
Choose an organizer with rounded corners and walls of moderate thickness. Very large rectangular trays are more likely to lift at the corners, so begin with a compact design. Clean the build plate before printing and monitor the first layer across the entire footprint.
Once the basic organizer succeeds, customize it around your own workspace. Add sections for memory cards, craft tools, coins or frequently used printer accessories. A personalized organizer is often more useful than a generic product because every compartment can match the items you actually own.
Bookmark
A bookmark is one of the fastest projects a beginner can complete. It uses little filament and provides a convenient way to test flat details, lettering and color changes.
The main challenge is thickness. A bookmark that is too thin may bend or break, while one that is too thick can be uncomfortable inside a book. A thickness of roughly 0.8 to 1.2 mm is a practical starting range, although the ideal measurement depends on the design and material.
Print it flat and use a smooth first layer because the build-plate side will become one of the most visible surfaces. Geometric patterns, names and simple silhouettes all work well.
Simple Storage Box
A small storage box introduces dimensional fit. Unlike a decorative model, the box and lid must work together, so the clearance between the two parts matters.
Choose a basic lift-off lid before attempting hinges, snap-fit closures or threaded containers. If the lid is too tight, check whether the slicer has an XY compensation setting or slightly adjust the scale of one component.
This is a valuable project because it shows that digital dimensions and printed dimensions are not always identical. Material shrinkage, extrusion flow and printer calibration can all affect the finished fit.
Bag Clip
A reusable bag clip is a slightly more advanced but still approachable project. It allows you to explore flexible movement and mechanical function without printing a complicated assembly.
Select a sturdy one-piece design with a thick bending section. PLA can work for occasional use, but PETG often provides better flexibility and resistance to repeated movement.
Do not use a printed clip as a guarantee of food freshness or an airtight seal. Treat it as a convenient organizer for lightweight household packaging rather than a certified food-storage product.
Headphone Hook
A desk-mounted headphone hook is another practical project that demonstrates how print orientation affects strength. The layer lines should be positioned so normal use does not easily pull them apart.
Some hooks attach with screws, while others slide onto the edge of a desk. Measure the desk thickness and headphone band before printing. Avoid loading a small plastic hook with expensive or unusually heavy equipment until you have tested it gradually.
This project is a good stepping stone toward brackets, mounts and other functional designs because it encourages you to think about forces rather than appearance alone.
Prepare Each Project in the Slicer
Even a simple model needs the right preparation. After downloading the file, open it in compatible 3d printer slicer software, select the correct printer and material profile, and confirm that the model sits flat on the virtual build plate.
For most beginner PLA projects, a 0.2 mm layer height provides a useful balance between detail and speed. Infill between 10% and 20% is often enough for decorative or lightly used objects, although functional parts may need thicker walls or additional infill.
Use the layer preview before exporting the G-code. Look for unsupported sections, unexpectedly thin walls and areas where the printer would begin extruding in midair. A short preview can prevent a long failed print.
How to Get Better Results
Start with a clean build plate and confirm that the bed is level. Watch the first layer closely: adjacent lines should touch without being excessively flattened. If they remain separate, the nozzle may be too far from the surface.
When a print fails, change only one setting at a time. Lowering speed, changing temperature, adjusting retraction and adding supports simultaneously makes it difficult to identify the real cause.
Keep notes about the material, temperature, layer height and result. Over time, these records become reliable profiles for your printer and working environment.
Manufacturers such as Creality also provide printers, software downloads and educational resources that can help new users understand the full workflow rather than treating every failed print as an isolated problem.
Where to Go After These Projects
Once you have completed several simple models, move toward projects with one new challenge at a time. Try a model with a small amount of support, a two-part assembly or a basic moving joint. Gradual progress builds practical knowledge without turning every print into a lengthy experiment.
You can also browse collections of the best things to 3d print when you are ready to explore more decorative, practical or ambitious designs.
The goal of beginner projects is not merely to produce objects. Each one teaches you something about adhesion, geometry, slicing, materials or dimensional accuracy. Start small, examine the result and make one thoughtful improvement on the next print. That process is how a new printer gradually becomes a dependable creative tool.