
You have a clear idea for a video. The subject is right, the mood is right, and the prompt sounds detailed. You press “Generate.”
The result may still feel wrong. A character is cropped at the knees. A product reveal moves too quickly. A vertical social clip arrives in a wide frame. Or the scene attempts so many actions that none of them reads clearly.
For beginners, prompt wording gets most of the attention, but several important creative instructions sit outside the prompt: aspect ratio, resolution, duration, input mode, and reference material. These settings influence where a clip can be published and how motion is organized inside the frame.
This guide explains how to plan those choices with Wan 3.0 Video before generating, so the first result is closer to something you can actually use.
Aspect Ratio Is Part of the Direction
An aspect ratio describes the relationship between a video’s width and height. A 16:9 frame is wide, a 9:16 frame is tall, and a 1:1 frame is square.
It is tempting to treat ratio as a delivery setting that can be fixed later. In practice, it also acts as a compositional instruction. A wide frame gives the model room for environments, lateral movement, and establishing shots. A vertical frame gives more space to standing subjects, tall objects, and movement toward or away from the camera.
Useful starting points include:
- 16:9 — Widescreen: YouTube, websites, presentations, landscape scenes, and cinematic establishing shots.
- 9:16 — Vertical: TikTok, Instagram Reels, YouTube Shorts, mobile advertising, and full-body subjects.
- 1:1 — Square: Centered product shots, social feed posts, loops, and symmetrical compositions.
- 4:3 — Classic Landscape: Documentary-style framing, editorial visuals, retro looks, and scenes that need more vertical space than 16:9 provides.
- 3:4 — Portrait: Fashion, character studies, posters, and subjects that feel cramped in a square frame.
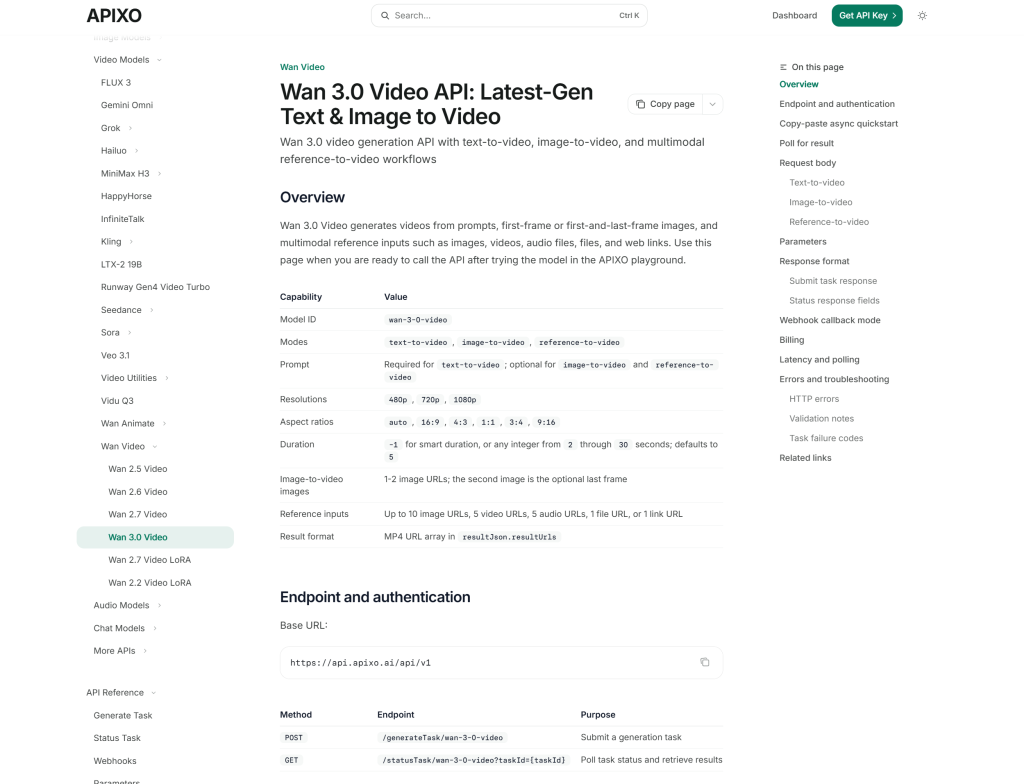
Wan 3.0 also supports an automatic ratio setting. That can be convenient when a source image already establishes the composition, but choosing the final publishing format deliberately usually makes the brief clearer.
Ratio and Resolution Solve Different Problems
Aspect ratio defines the shape of the frame. Resolution describes how much visual detail the output contains.
Wan 3.0 offers 480p, 720p, and 1080p output options. Higher resolution can be valuable for final delivery or larger screens, but it does not repair a weak composition or an unclear camera instruction. A sharp video with the wrong framing is still the wrong video.
For early experiments, first validate the subject placement, motion, and timing. Once the shot works, move to the resolution required by the final channel. This separates the creative question—“Is this the right shot?”—from the technical question—“Is this detailed enough to publish?”
Match the Input Mode to What You Already Have
Before writing a long prompt, decide what source material is available. A practical Wan 3.0 workflow can begin in three ways:
- Text-to-video: Use this when the idea exists only as a written description and the model needs to build the scene from scratch.
- Image-to-video: Choose this when a product image, illustration, character design, or first frame should define the shot. A second image can establish the desired final frame.
- Reference-to-video: Use this when the brief depends on several kinds of guidance, such as visual identity, motion, rhythm, atmosphere, or supporting context.
The best mode is not necessarily the one with the most inputs. It is the one that gives the model the clearest starting point. If a product must keep a specific appearance, an image is often more useful than another paragraph of adjectives. If a camera move is difficult to describe, a short motion reference may communicate it more directly.
Think in One Shot, Not an Entire Film
A common beginner mistake is asking one generation to behave like a complete edit:
“Show a woman entering a café, ordering coffee, sitting by the window, opening a laptop, receiving a message, smiling, and then transition to a product logo.”
That is not one shot. It is a sequence.
AI video becomes easier to direct when each generation has one main visual idea. Break the example into separate clips: an entrance shot, a coffee close-up, a seated lifestyle shot, and a final brand frame. Each clip can then have its own ratio, camera movement, and duration.
This also makes revision easier. If the coffee close-up fails, you only need to revisit that shot rather than regenerate the whole story.
Build the Prompt Like a Mini Shot List
A useful video prompt does not need to be poetic. It needs to make the creative decisions legible.
Try this structure:
Subject + action + environment + camera + lighting + visual style + pace
For example:
“A matte silver running shoe rotates slowly on a dark stone platform in a minimal studio. The camera makes a controlled half-orbit from left to right. Soft rim lighting defines the outline, with a subtle reflection below the product. Premium commercial style, calm pacing, no sudden camera movement.”
Each phrase has a job. The subject defines what matters. The action identifies the main movement. The environment establishes context. Camera and lighting describe how the viewer experiences the scene. Style and pace keep the result from drifting into a different visual language.
Specificity helps, but conflicting instructions do not. “Static camera,” “fast handheld movement,” and “smooth drone orbit” should not appear in the same shot unless the transition between them is explicitly planned.
Use Duration as a Creative Constraint
Wan 3.0 supports fixed durations from 2 to 30 seconds, as well as a smart-duration option. The longest setting is not automatically the best one.
Short clips are often easier to evaluate because the model has fewer events to interpret. A five-second product reveal with one deliberate camera move may be more useful than a twenty-second prompt that tries to introduce a product, demonstrate it, change locations, and end with a call to action.
Use a fixed duration when clips must fit an edit or campaign template. Smart duration is more suitable for exploration when the natural length of the action matters more than matching a precise timeline.
Give Every Reference a Specific Job
Wan 3.0 can work with image, video, audio, file, and link references. That flexibility is useful, but more material does not automatically produce a clearer result.
- Images can define a character, product, environment, composition, first frame, or final frame.
- Video references can demonstrate motion, camera behavior, or physical interaction.
- Audio references can suggest rhythm, energy, atmosphere, or performance pace.
- Files or links can provide supporting context when the prompt alone is not enough.
Explain how each reference should be used. “Use image one for the product’s appearance, image two for the lighting direction, and the video only for camera movement” is clearer than attaching several inputs without assigning priorities.
Troubleshooting Common Beginner Problems
The subject is cropped or surrounded by too much empty space.
Review the aspect ratio and the subject’s orientation. A standing character may need a vertical frame, while a landscape scene generally benefits from a wider format.
The motion feels chaotic.
Reduce the number of actions and camera directions. Keep one primary subject movement and one primary camera movement.
The output is detailed but still unusable.
Do not treat resolution as a substitute for direction. Revisit composition, timing, and the prompt before increasing output quality.
The style changes during the clip.
Clarify which reference controls identity and which controls mood or motion. Avoid asking several references to define the same element in conflicting ways.
The scene feels rushed.
Simplify the action, increase the duration, or split multiple story beats into separate shots.
A Simple Wan 3.0 Workflow
- Choose the destination. Decide whether the clip is widescreen, vertical, square, or another format.
- Describe one shot. State the subject, action, setting, and camera direction.
- Select the input mode. Use text, a key image, or multiple references according to what the project already has.
- Run a controlled test. Check framing and motion before aiming for final delivery.
- Change one variable at a time. Adjust the camera, duration, reference role, or framing separately so you can identify what improved the result.
- Create the production pass. Once the shot works, generate at the resolution and duration required by the final channel.
Creators may want to test ideas visually, while developers may need the same model inside an application or automated pipeline. APIXO provides browser-based creation and API access in one platform, helping teams move from prompt exploration to a repeatable implementation without changing the basic creative brief.
Conclusion: Direct the Shot Before You Generate It
Better AI video does not always come from a longer prompt. It comes from clearer decisions.
Choose the frame before describing the scene. Match the input mode to the material you already have. Give the clip one main action, one understandable camera direction, and enough time to complete the movement. Use resolution for delivery quality, not as a repair tool, and give every reference a defined purpose.
Wan 3.0 Video offers flexible ways to build a clip, but the basic lesson is simple: plan the shot first, then generate it.