There is no denying that working on a laptop is convenient. However, the small screen can sometimes feel a bit limiting. Whether you are writing, designing, attending meetings, or managing multiple tasks, constantly switching between tabs and windows can slow you down. This is where the importance of a second screen comes in.
Many people believe that they need a large office setup to enjoy the benefits of two screens. However, this is not necessarily true. A lightweight extra screen is perhaps the only thing you need to transform your laptop into a powerful workspace wherever you are.
Read on to learn more about how you can easily use an extra screen with your MacBook and create a comfortable dual-screen workspace.
AI-Powered Productivity and Workspace Efficiency
![]()
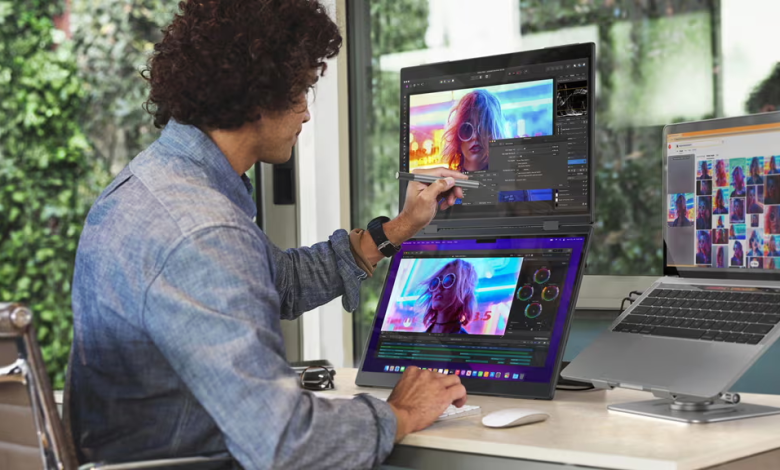
A dual-screen setup is not just about having more space. It is also about working in a smarter and more organized way. When you have two screens, it becomes easier to manage multiple tasks at once without constantly opening and closing tabs or switching between windows.
This can be especially helpful for people who work with digital tools, write content, attend online meetings, or handle research tasks. For example, you can keep your main work on one screen while using the second screen for notes, reference material, or communication apps. This makes the entire workflow feel more efficient and less distracting.
Second Screen & Productivity – An Overview
You should know that having a second screen alone can contribute to better focus and improve productivity. The underlying reason is that you no longer have to open and close multiple tabs, as you will have all the different tasks visible at the same time.
For instance, if you write on one screen and research on another. A second screen will allow you to keep all windows open while taking notes. Second screens are also useful for business professionals, designers, and students, as everyone can benefit from this extra space.
More importantly, having two screens can significantly minimize distractions as you spend less time navigating tabs and searching for files.
Choosing the Right Portable Display
Now that you know the importance of having two screens, let us explore how you can choose the right portable display. With that said, before actually setting up your workspace, you need to select a good screen that works well with your MacBook. Many modern screens are lightweight, portable, and thin.
For instance, well-known brands like UPERFECT provide a variety of slim, lightweight displays that are exclusively designed for convenience and mobility. Their screens are easy to place next to your laptop and usually come with simple cables that enable quick connection.
The goal of a portable display is to create a setup that feels natural and is easy to use.
How Portable Monitors Support Modern Tech Workflows
Portable monitors have become a practical solution for people who want flexibility without giving up productivity. Since they are lightweight and easy to carry, they can be used almost anywhere, whether at home, in the office, or while traveling. This makes them a good choice for users who need a simple way to expand their workspace.
They also fit well into modern work habits, where multitasking has become a normal part of the day. A portable monitor can help when you are editing content, joining video calls, reviewing files, or managing several tasks at once. By giving you extra screen space, it helps create a setup that feels more comfortable, more organized, and easier to work with.
Connecting the Monitor to Your MacBook
You should know that connecting an extra screen to your MacBook is actually very simple. As a matter of fact, most modern displays can connect with a single cable. Once connected, your MacBook will then recognize the screen automatically. Also, once connected, you can open the display settings on your MacBook, from where you can decide how you want to use the tool screens.
In many cases, a portable monitor works almost instantly after connection. What this means is that within seconds, you can drag tabs from your MacBook screen to the second display and start working.
Setting Up Your Dual-Screen Workspace
After the screens are connected, you can arrange them in a way that feels comfortable and productive. For instance, many people prefer placing the second screen directly next to the laptop. However, if you want, you can keep it slightly angled for a better viewpoint.
Go to your MacBook display settings and adjust how the screens are arranged. For instance, you can position the second screen on the right or left side, depending on your desk setup. By doing so, you can ensure that your cursor moves easily between screens.
Once you get the setup right, working with a dual monitor layout becomes very smooth. You will only take a few minutes to get used to this setup.
Effective Tips for a Comfortable Setup
You should know that creating a good workspace is not only about having two screens. With a few adjustments, you can make a big difference in productivity and comfort. With that said, we recommend keeping both screens at a comfortable eye level. By doing so, you can minimize neck strain. If possible, you can position your laptop on a small stand.
Also, make sure that your desk actually has enough space to adjust both screens. More importantly, an organized and clean workspace can help you stay focused. Do not forget to adjust brightness levels so that both screens look similar so you can maintain comfortable eye movement between them.
Final Thoughts
At the end of the day, adding a second screen to your MacBook is actually one of the easiest methods to improve your workflow and productivity. The best part is that it gives you more space to work, helps you stay organized, and enables you to handle multiple tasks without feeling stressed or overwhelmed.