3D printing opens a world of possibilities, from custom figurines and prototypes to functional objects. Traditionally, designing 3D models for printing required expert-level software knowledge and manual modeling skills. Today, Image to 3D AI tools make it possible to create printable 3D models directly from 2D images—perfect for beginners and hobbyists alike.
In this guide, we will explain how to generate 3D models from images that are optimized for 3D printing using modern Image to 3D Model AI technology.
ALT: How to Create 3D Models for 3D Printing from Images
Why Use Images for 3D Printing Models?
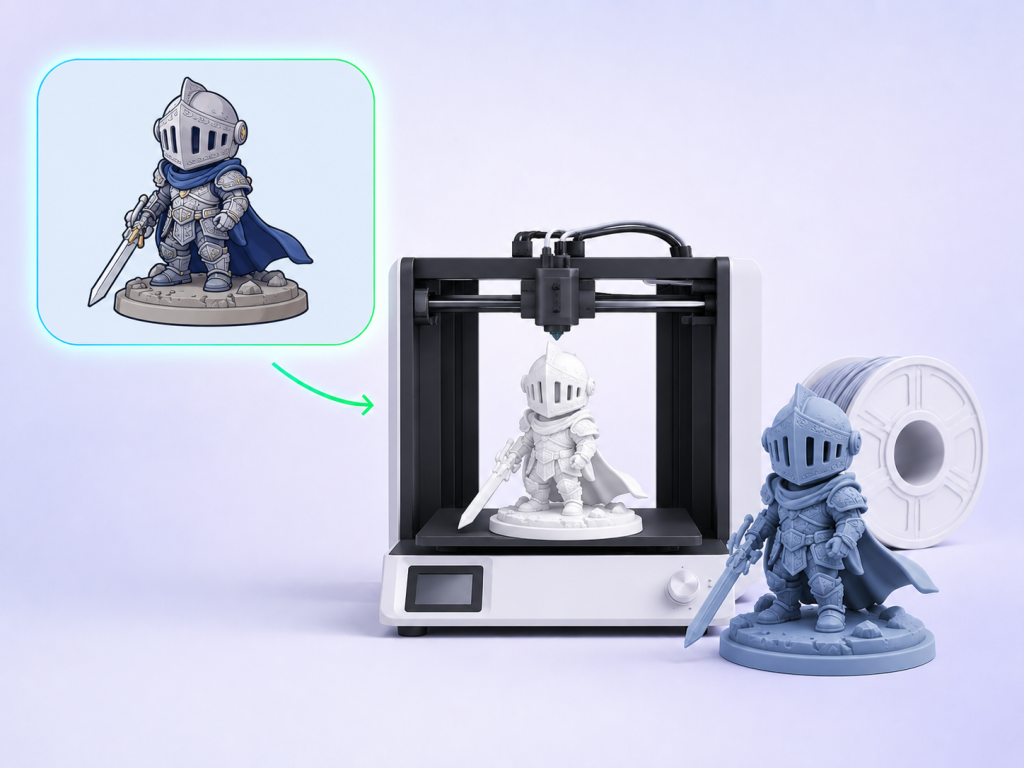
alt: image to 3d printing model example
Using images as the starting point for 3D printing provides several advantages:
- Rapid Prototyping: Quickly turn a concept or photo into a printable model.
- Accessibility: No need for complex CAD software.
- Customization: Personalize objects, figurines, or props.
- Creative Freedom: Transform 2D artwork into tangible 3D objects.
AI-based conversion tools bridge the gap between 2D design and 3D printable models, making 3D printing more approachable.
Step 1: Choose the Right Image
The quality of your 3D print depends heavily on the input image.
Best Practices:
- High Resolution: Higher resolution images give more detail for AI reconstruction.
- Clear Subject: Make sure the object is fully visible and isolated from the background.
- Good Contrast: Helps AI differentiate edges and shapes.
- Simple Backgrounds: Reduces confusion in depth prediction.
Images to Avoid:
- Blurry or low-resolution images
- Crowded scenes or overlapping objects
- Extreme shadows or reflective surfaces
For 3D printing, images that clearly show the object’s contour and shape yield the best results.
Step 2: Select an Image to 3D AI Tool
Not all AI tools are suited for printable models. Look for platforms that:
- Generate watertight meshes suitable for printing
- Support export in STL or OBJ formats
- Allow mesh refinement or simplification
- Can process multiple images for more accurate depth
Recommended Tools:
- Meshy AI: Beginner-friendly, fast mesh generation
- Deep3D Generator: Handles complex textures and shapes
- Pix3D AI: Supports batch processing and multiple file formats
Step 3: Upload Image and Configure Settings
Once you’ve selected a tool:
- Upload your image in JPG, PNG, or WEBP format.
- Configure settings:
- Mesh Detail: Higher detail improves print quality but increases file size.
- Scale: Set approximate real-world dimensions if the tool allows.
- Closed Mesh Option: Ensure the model is watertight for printing.
- Start the AI generation process. Depending on the tool, this may take seconds to minutes.
Step 4: Inspect the 3D Model
After generation:
- Rotate the model to check for holes or missing parts
- Inspect thin areas that may not print correctly
- Verify that surfaces are smooth enough for 3D printing
AI models often require small adjustments to become fully printable.
Step 5: Optimize for 3D Printing
Mesh Cleanup
- Remove floating vertices or internal geometry.
- Simplify overly complex areas while preserving key details.
Scale Adjustment
- Ensure the model fits your printer’s build volume.
- Check minimum wall thickness (depends on printer type).
Smoothing and Supports
- Smooth rough surfaces for better print quality.
- Add or generate supports if the model has overhangs.
Many 3D software programs like Blender, Meshmixer, or PrusaSlicer can help with optimization.
Step 6: Export the Model
For 3D printing, export the final mesh in supported formats:
- STL: Most common for FDM printers.
- OBJ: Supports texture information if using resin printers with color.
- GLB / GLTF: Useful if combining with AR/VR before printing.
Make sure to check the file in your slicer software before printing to ensure compatibility and size accuracy.
Tips for Better 3D Printing Results
- Choose High-Contrast Images: Sharp edges and clear contours improve depth prediction.
- Use Multiple Angles: Some AI tools allow multiple images to improve 3D reconstruction.
- Avoid Extremely Thin Details: They may break during printing.
- Check for Watertightness: Closed meshes are essential for successful prints.
- Start Small: Test print at a smaller scale to identify potential issues before full-size printing.
Common Challenges
- Hair and Fine Details: Thin lines or flowing elements may not print well.
- Complex Textures: AI textures often need simplification for printing.
- Overhangs: May require supports to print correctly.
- Non-Printable Geometry: AI sometimes generates internal faces or holes that need fixing.
These are easily addressed using mesh editing and slicing software.
Applications of AI-Generated 3D Models for Printing
- Custom Figurines: Turn your favorite character or object into a collectible.
- Prototypes: Quickly prototype product designs or parts.
- Cosplay Props: Generate accurate 3D models from reference images.
- Educational Projects: Bring diagrams, artwork, or concepts to life.
- Gifts and Merchandise: Personalized printed models for friends, fans, or customers.
Conclusion: Turn Images into 3D Prints with Image to 3D AI
Using Image to 3D AI, anyone can now create printable 3D models from images without advanced 3D modeling skills. By following this workflow—from selecting the right image, choosing the appropriate AI tool, optimizing meshes, and exporting for printing—you can transform 2D visuals into tangible 3D objects.
Modern Image to 3D Model AI tools make 3D printing accessible, fast, and creative, empowering hobbyists, designers, and educators to bring ideas to life with minimal effort.