Many people like the idea to turn a favourite photo into a drawing made by black pencil or coloured pencils. Real work by hand requires both talent and colossal time. Below are the programs that really do the job well.
Desktop Applications
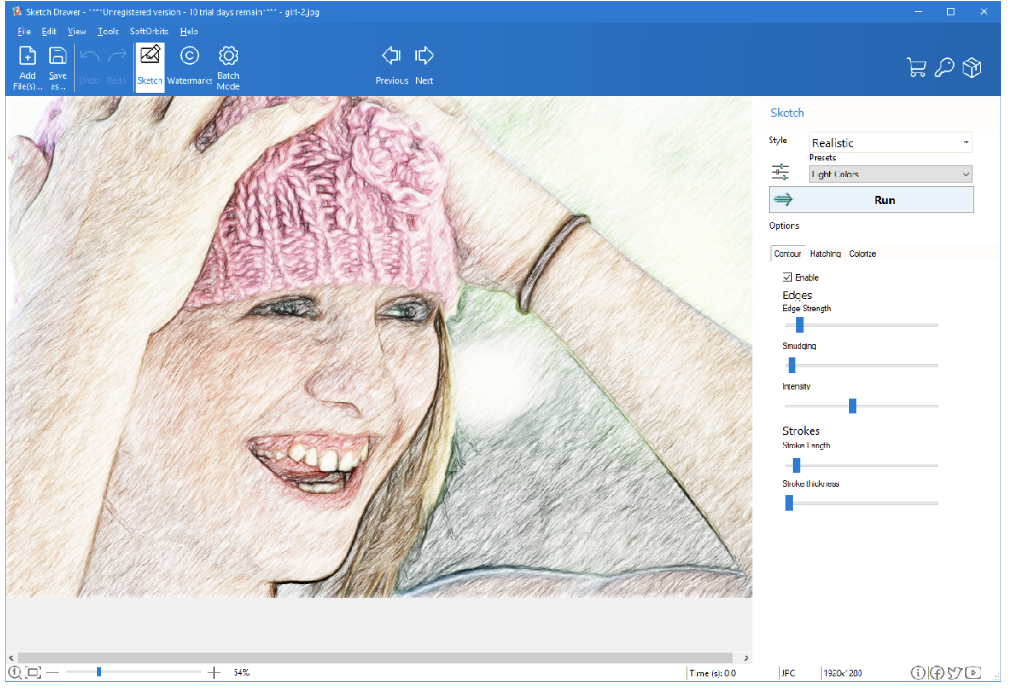
1. SoftOrbits Sketch Drawer
This tool — will allow you to process many files at once. It often happens that other programs lag on heavy images, but SoftOrbits Sketch Drawer remains stable even with 20MB+ files. It uses a special contour detector that separates the main object from the background better than usual filters. You can adjust the stroke hardness and even the hatching angle.
Test showed: the “Simple Sketch” preset (it is an old algorithm, but many people like it) renders in less than 1.4 seconds on a regular Intel i5. That is fast. Price is $59.99 USD, but discounts happen regularly, so there is a chance to buy it much cheaper.
- Pros: Processes batches of 50+ shots; understands rare formats like Photoshop PSD or TGA; works offline – peace of mind for privacy.
- Cons: Interface does not look modern, though there is a dark theme; no version for macOS.
Instructions:
- Start the program, press “Add File”, add shots.
- On the right, choose, for example, “Realistic”.
- Manually move “Edge Strength” to 75% — this way the contours will become sharper.
- Press “Run” and save the whole batch.
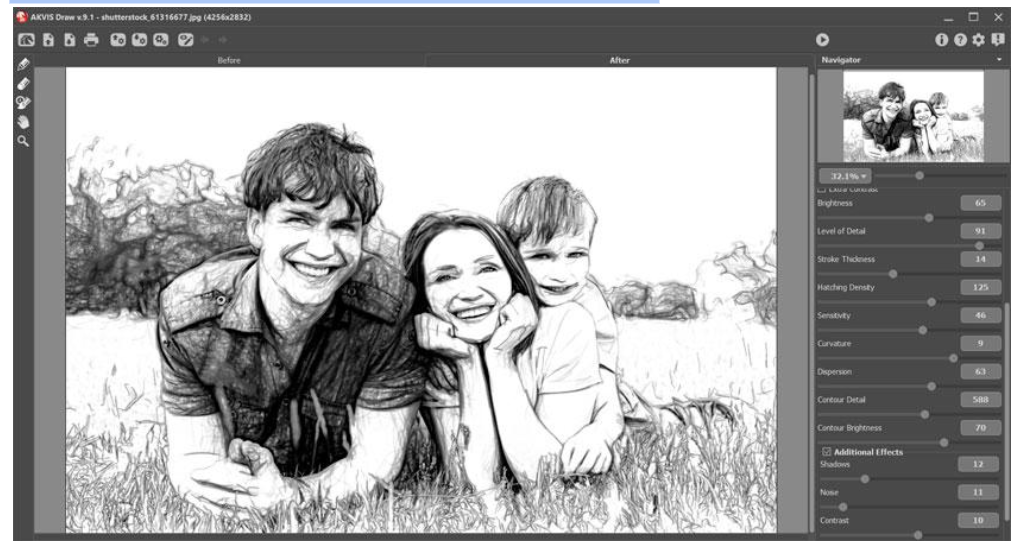
2. Akvis Sketch
Akvis is usually more expensive; it is for those who value precise texture imitation. A Home Deluxe license costs around $89 USD. The uniqueness is their signature “Maestro” mode, which imitates broad strokes as if painted on a rough canvas. It was tested on a portrait with a complex, curly hairstyle. There are no digital defects like those often found in cheap software. Also, there is a time preview; you can “freeze” the conversion if you need the drawing to look unfinished.
- Pros: Ultra-precise hatching angle adjustment (from 0 to 180 degrees); “Timeline” feature is fire; there is a plugin architecture.
- Cons: Interface looks old-fashioned, reminds of software from the early 2000s; renders long on old CPUs; price bites.
Instructions:
- Open Akvis.
- Load photo, choose “Artistic Mode” at the top.
- Via the “Charcoal” tool, you can manually darken shadows.
- Press “Play” in the “Navigator” window and save the result.
3. FotoSketcher
This free software — is a personal project of one developer, David Thoiron. But it gives a head start to many paid ones. It is written in C++, so it takes up less than 15 MB. There are no neural networks like in expensive ones, but there are 20+ algorithmic scripts. The “Painting 10” script fakes oil pastel well. It is not fast: it rendered a 4K image for almost 12 seconds. But for $0, it is hard to complain. There are no ads, which is generally a rarity for free stuff.
- Pros: Completely free; there is a portable version (works from a flash drive); you can add text directly on the drawing.
- Cons: No batch processing in the basic version; preview window has low resolution; “Undo” function remembers only the last action.
Instructions:
- Drag the photo into the workspace.
- Press F10 for the parameter’s menu.
- Choose “Pencil Sketch 4” and check the “Soften edges” box.
- Press “Draw” and wait for completion.
Online and Specialized Tools
4. BeFunky (Web version)
BeFunky works in the cloud, using servers rather than your graphics card. The “Digital Art” module (available by Plus subscription for $14.99/mo) uses DLX technology (deep learning). Instead of just making it black and white and more contrasty, it rebuilds the geometry of the shot. Tests showed that a 5MB JPEG uploads and processes in about 6 seconds on a good internet connection. This is convenient, but you are renting the tool, not owning it.
- Pros: Works on any system (Linux, Mac, Windows); large library of vector graphics; has a layer management system.
- Cons: Monthly subscription is expensive in the long run; maximum resolution is limited to 4000px; constant internet is needed.
Instructions:
- Enter the BeFunky editor via browser.
- Upload file, press “Artsy” on the left.
- Choose the “Sketch” filter and through the “Settings” icon decrease “Opacity”.
- In the “Save” tab, choose “Computer” for downloading.
5. Painnt (PC and Mobile app)
Painnt is heavily focused on style transfer via neural networks. There are more than 2000 filters — a very large amount. The PC version gives high-resolution output but brutally consumes resources, often taking 60-70% of the video card during work. It shows itself best on abstract sketches where realism is not the main thing. The free version puts a watermark; a paid subscription costs about $10 USD per year. It processes shots in tiles and then sews them back together.
- Pros: Huge number of styles; has a community gallery for inspiration; annual price is low.
- Cons: Strong watermark in free mode; interface is cluttered with “locked” filters; might freeze on old video cards.
Instructions:
- Install the app from the store.
- Choose a style in the “Sketch” category (for example, “Urban”).
- Import photo; the app will start processing itself.
- Adjust “Transparency” to blend with the original and save.
6. XnSketch
XnSketch — is old software from the creators of XnView. It is simple but very fast. No AI. It uses mathematical matrices to find contours. Because of this, you get a very sharp, contrasty look, like a blueprint or a comic book page. Only 18 effects in total. Test: it processed a folder of 100 shots in less than a minute. Free and works on Linux, Windows, and Mac without problems.
- Pros: Processing is almost instant; takes little space; has unique “Neon” and “Pastel” algorithms.
- Cons: Hasn’t been updated for a long time; maximum resolution can glitch; interface is not adapted for new screens.
Instructions:
- Open XnSketch, press the “Open” icon.
- Click on the desired sketch thumbnail at the bottom.
- Move “Gamma” and “Exposure” so the light is correct.
- Press “Save” to save in PNG.
7. Corel Painter Essentials
This is a simplified version of professional Corel Painter, costing about $45. It is made for those who use a graphics tablet (Wacom/Huion). The “Photo Painting” function can convert automatically, but the highlight is the “Cloning” brush, which allows you to manually paint over the shot using its colours. It uses “RealBrush” technology to imitate the physics of a pencil lead. The software is heavy; you need at least 8 GB of RAM.
- Pros: Professional brush physics; works great with stylus pressure; supports PSD.
- Cons: Too sophisticated for simple one-click actions; large installation file (more than 1 GB); can be difficult for beginners.
Instructions:
- Open the program, on the start screen choose “Photo Art”.
- Specify your shot as “Source”.
- Press “Auto-Paint” for a quick base.
- Finish the details with the “Pencil” tool and save.