You are viewing a long-awaited vacation video, but you are not watching crystal-clear waves; you are watching a pixelated mess. Suddenly, your cinematic moment looks like an 8-bit video game. Don’t worry, you’re not alone. We have all gotten to play and then found out that we have nothing but a frustratingly pixelated image.
The good news is, it’s not the end of your footage! Pixelation is often fixable with the right approach. It can be through applying AI upscaling, an improved playback setting, or restoring the initial file. This guide will take you through the steps on how to fix pixelated videos, the reason why it occurs, and how to ensure that your future video recordings are clear and smooth.
Part 1. Why Does My Video Look Pixelated or Grainy?
Pixelation occurs when your video doesn’t have enough data to display a smooth image. Imagine zooming in too far on a low-quality picture until the blocks show.
There are several possible causes behind this frustrating problem:
Low Resolution or Heavy Compression
When a video is compressed to reduce file size, details are lost. The software replaces missing image data with blocky color patterns, creating visible squares. Online uploads or social media re-encodes can also cause this.
Corrupted File Data
If the video was interrupted during recording, transfer, or saving, some frames may be unreadable, resulting in mosaics, flickering, or partial playback.
Improper Export Settings
Using the wrong codec, low bitrate, or mismatched resolution when exporting from your editor can drastically reduce quality. Always export with settings that match your footage’s native resolution.
Playback or Streaming Issues
Sometimes the video file itself is fine, and it’s the player or network issue. Pixelated video playback can result from unstable internet, outdated drivers, or hardware-accelerated decoding errors.
Poor Lighting or Camera Settings
Shooting in low light forces the camera to raise ISO, producing grain or digital noise that looks like pixelation during playback.
In short, pixelation happens when your video doesn’t have enough visual data to draw smooth edges or textures.
Now that you know why is my video grainy or why videos become pixelated, let’s see how to fix them easily.
Part 2. How to Fix Pixelated Videos?
Here are the most reliable methods to restore clarity, fix corruption, or enhance resolution.
Way 1 – Fix Pixelated Video with 4DDiG AI Video Enhancer
When your footage is low-resolution or noisy, AI-powered tools can intelligently fill in lost details. A modern AI video enhancer like 4DDiG AI Enhancer analyzes each frame, removes compression artifacts, and sharpens edges to make your video appear naturally higher quality.
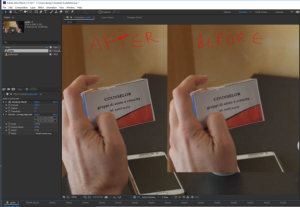
1.Run the program and click “AI Enhancer“, then click the “Video Enhancer” option and click the “Add Videos” button to add your pixelated videos directly.
PS: Your original video is never modified, ensuring complete peace of mind.

2.Select the “AI Model” according to the content of your video and choose the desired resolution. You also need to pick the “AI Enhance” option, then click “Enhance” to begin processing.

3.4DDiG will enhance your video and display it in a side-by-side comparison. Compare, and when you are satisfied with the results, click “Save” to download the enhanced video to your offline storage.
AI enhancement doesn’t magically recreate what was never recorded, but it can unpixelate video online convincingly by reconstructing missing textures and improving overall clarity. AI Video Enhancer like 4DDiG provide a “preview-before-save” workflow so you can judge if the improvement suits your project before committing.
Way 2 – Recover from the Original Video File
Sometimes, the simplest fix is finding the original version. Many pixelation issues come from working with compressed copies or corrupted exports. If you can locate your original footage, you can often fix the issue instantly.
1.Check your SD card, external drive, or cloud backup for the master file.

2.Copy the original file using checksum verification to ensure it’s intact by running the following PowerShell commands: “Get-FileHash “D:\Originals\video.MOV” -Algorithm SHA256″ and “Get-FileHash “C:\Videos\video.MOV” -Algorithm SHA256”
3.Copy and note the checksum value for both original and copy files, and if they match, the video is perfectly intact.
4.Reopen the raw file in your video editor and re-export using a higher bitrate and matching resolution settings.
Always recover the original video file before trying complex fixes. Keeping raw master copies is the best way to avoid permanent quality loss.
Way 3 – Use Adobe After Effects to Fix Pixelated Video
For editors who want hands-on control, Adobe After Effects includes professional tools to refine low-resolution clips and increase video resolution through smart scaling.
1.Import your clip into After Effects.
2.Apply “Detail-Preserving Upscale” from the Effects panel.
3.Adjust “Scale” and “Sharpen’ to restore lost edges.
4.Combine with “Reduce Noise” or “Unsharp Mask” for the best balance.
5.Export at a higher bitrate, e.g., 20–40 Mbps for 1080p.
This method is perfect for slightly blurry or pixelated clips, though it can be time-consuming. Remember, these tools enhance detail perception, not recreate missing frames. For heavily corrupted files, AI repair tools may be more effective.
Way 4 – Fix Pixelated Videos with VLC Media Player
If pixelation happens only during playback, the issue might lie with your video player or system settings. VLC offers quick fixes that can make playback smoother.
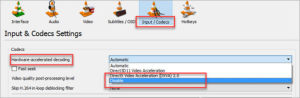
1.Open the video in VLC and go to “Preferences”, then go to “Input/Codecs” and disable “Hardware-Accelerated Decoding’.
2.Under “File Caching”, increase the value (e.g., to 600 ms or higher).
3.Save changes and restart VLC.
4.If video file fixing is needed, click “Media” then “Convert/Save” to re-encode the file in a stable format.
These adjustments often resolve pixelated video playback caused by hardware conflicts or unstable decoding, especially on older devices.
Part 3. How to Avoid Pixelated Videos in Pre-Production
Prevention starts before you even hit record. Follow these quick best practices to prevent pixelated video and reduce the need for post-fixes:
- Record at native resolution: Match your camera and project settings (e.g., 1080p projects must be recorded in 1080p).
- Use sufficient bitrate: Avoid extreme compression and aim for 10–20 Mbps for HD, 30–50 Mbps for 4K.
- Shoot in good lighting: Reduces noise and helps avoid grainy video during low light.
- Avoid excessive zooming or cropping: This effectively lowers resolution.
- Always save raw files: Keep masters on external drives for future re-exports.
Before uploading, export a short test clip to confirm that your platform (e.g., YouTube, TikTok) doesn’t re-encode your video too harshly. This hack to fix grainy video saves your time and effort.
Conclusion
You can destroy a good memory by watching pixelated footage, but this is not the end of the story. It can be a compression artifact, a bad export, or playback glitches. So, it is time to get repairing now that you know how to fix pixelated videos.
You should begin by analyzing your original file, testing VLC or After Effects to play and upscale, fix pixelated videos, or an AI video enhancer such as 4DDiG to restore detail automatically.
Lastly, record at the correct resolution, do not dim the lights, and back up your master copy. With some simple habits, pixelated videos will be a thing of the past, and your videos will be crisp well into 2025.