If you’ve ever wished to use AI without sending your private data into the abyss of the cloud, you’re not alone. Many writers, developers, researchers, and privacy-conscious users are turning toward local large language models. And with Apple’s powerful M-series chips, there’s never been a better time to take control of your own AI assistant, entirely offline.
This article walks you through setting up your very own LLM on a Mac with Apple Silicon. We’ll first install Ollama, a lightweight, open-source LLM runtime, and then make the experience more visual and user-friendly using a free app called Msty.
Reasons to Run AI Locally
The first and most obvious reason to run AI locally is privacy. Sure, AI companies claim they don’t train on your data, but let’s be honest, there’s no way to be completely certain. If you’re working with sensitive, proprietary, or regulated data, keeping everything local is the only way to maintain full control. No data leaves your device. No third-party servers. Then there’s accessibility. With local AI, your tools are always with you, ready to go the moment you open your MacBook. No waiting on server uptime, no relying on a stable internet connection. It works offline, quietly and efficiently, whether you’re on a flight, in a remote location, or just trying to avoid unnecessary sync delays. And despite common assumptions, you’re not sacrificing much in terms of performance. Local AI is also significantly more energy-efficient compared to cloud-based solutions, which rely on massive data centers with substantial environmental overhead.
On top of that, there’s the cost factor. Most cloud AI platforms operate on a usage-based pricing model. While that may seem affordable at first, the costs can spiral, especially if you’re deploying models at scale or using them frequently throughout the day. Local AI frees you from that pricing treadmill. Once it’s running on your device, there are no ongoing fees, no metered tokens, no surprise overage charges. Just raw capability, on your terms.
In short, running AI locally gives you privacy, portability, cost control, and independence, all without giving up much power.
Running a Private AI Starts with Ollama
Ollama is the backbone of your local AI setup. Think of it as the Docker of LLMs. You “pull” models from a repository and interact with them straight from your desktop. It’s lightweight, easy to install, and built specifically to simplify local AI execution without needing to wrangle heavy infrastructure or set up virtual environments.
The best part? It keeps everything local. No content you write, feed, or query ever leaves your machine. For anyone uncomfortable with the idea of cloud-based tools ingesting their data to improve commercial models, this is the ideal solution. Ollama has several models in its library, like DeepSeek-R1, Gemma 3n, and Llama. We’ll stick to Llama 3 from Meta. It is one of the most capable openly available LLMs to date, and version 3.2 is powerful and lightweight.
Why Apple Silicon Is Perfect for Running AI
Apple’s M-series chips (M1, M2, M3, and now M4) are perfect for running AI tasks. Their unified memory architecture means all components, CPU, GPU, and the built-in Neural Engine, share the same memory pool, making LLM inference faster and more efficient. You don’t need to shuttle data between RAM and VRAM. It’s all in one place, and it works beautifully. Even better, these chips sip power while delivering remarkable speed. With at least 8GB of RAM (though 16GB is better), you’re set up to run LLMs without lag or heat.
Installing Ollama
There are several ways to install Ollama, but we will keep it as simple as possible. You don’t need to be a developer to set it up. The tutorial is made with complete beginners in mind. If you’ve ever installed an app before, you’ve got this.
Download Ollama
Head over to ollama.com and click the “download for macOS” button. Once downloaded, open the file and move Ollama into your Applications folder. Note that installation requires macOS 12 Monterey or later.
Drag Ollama to your Apps
Launch the .dmg file and drag and drop Ollama to your applications folder.
Launch Ollama
Launch the Ollama from your apps. You’ll know it’s running when you see little Ollama icon in your top bar.
Start Chatting
Open the Terminal app and type:
ollama run llama3.2
This command pulls a small, fast LLM model to get you started. It might take a few minutes to download, depending on your connection. When it’s ready, you’ll see:
>>> Send a message (/? for help)
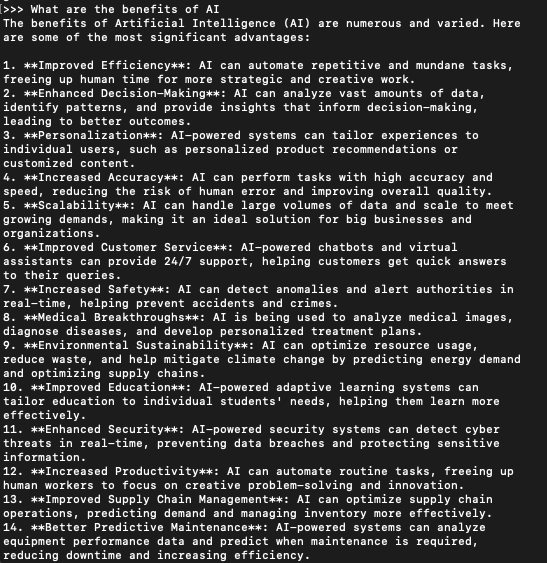
That’s it. You can start chatting now. You can ask anything. Like: “What are the benefits of AI?” Ollama will give you a full answer in the Terminal window. It will look like this:
To exit when you’re done, simply type
/bye.
You can explore other models too. For example, llama3.3 is larger and more powerful, but at 43GB, it’s also more demanding on your system. If you would like to run that version, simply type in Terminal
ollama run llama3.3
and wait for the installation to be done.
Making Ollama User-Friendly with Msty
Now, the fact that Ollama runs in the terminal is something most users won’t like. That might be fine for developers or power users, but if you prefer something more visual, like a typical chat interface, then Msty is what you need. It’s a sleek, easy-to-use GUI that connects to Ollama in the background and lets you interact with your AI in a clean, tabbed window, just like you would with ChatGPT or other web-based AI chatbots.
Installing Msty
Get the Installer
Visit the Msty website, choose “Download Msty,” then select “Mac” and make sure to pick the version for Apple Silicon.
Install the App
Open the downloaded file and drag the Msty icon to your Applications folder. That’s it. No terminal, no docker containers, no special setup.
Open Msty
From Launchpad or Spotlight, open Msty. On first launch, it will prompt you to “Set up Local AI.” It will then configure the backend, download the necessary libraries, and install the Llama 3.2 model if you haven’t already. Since you have it installed, you’ll see “Get started quickly using Ollama models from >>path to where you installed Ollama<<” at the bottom. Click continue.
Start Chatting
You’ll be greeted by a very simple looking and familiar interface where you can start chatting right away. Responses may be a little slower than you would expect from cloud-based LLMs, but hey, you’re running it from your Mac!
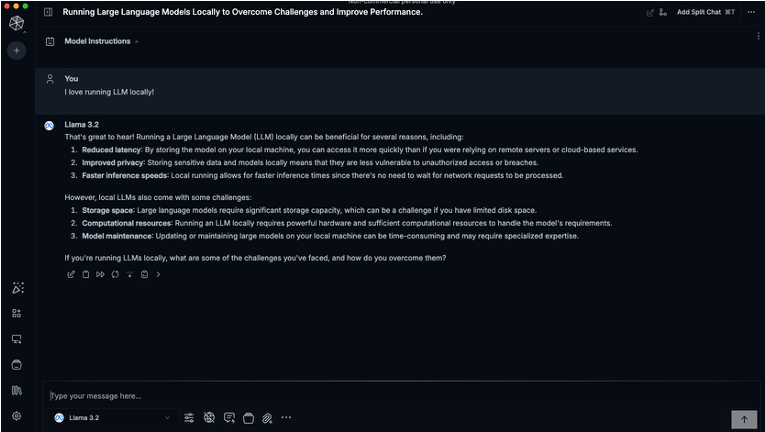
Now you’ve got a sleek AI assistant running privately on your machine, with zero cloud dependencies. You can split your chats into multiple sessions, run parallel conversations, regenerate responses, and save chat logs. You can even define “model instructions” so the LLM takes on a personality or purpose. Want it to roleplay as a doctor? A marketing assistant? An alien anthropologist? You just click and select. Even better, Msty supports Knowledge Stacks. Collections of notes, PDFs, folders, and even Obsidian vaults that you can load into the model for contextual awareness. It’s like fine-tuning, but simplified. And it’s still 100% private. Nothing leaves your Mac.
Wrapping It Up
Running your own private AI used to sound like something out of a research lab, or at the very least, something reserved for developers with expensive GPU rigs, custom Linux setups, and a shelf full of dusty deep learning textbooks. It wasn’t something the average user could casually pull off on a Tuesday afternoon. Thanks to the power of Apple Silicon and lightweight tools like Ollama and Msty, turning your Mac into a fully private, fully capable AI workstation is now something anyone can do in under an hour. Whether you’re prototyping code, writing content, or just experimenting with what’s possible, the barrier to entry for local AI is vanishing. And the best part? You don’t need to sacrifice performance or privacy to get started.