Introduction
Many computer users have experienced the panic that comes with discovering an unsaved document is gone. Whether the power suddenly shut off, an application crashed, or the user accidentally closed the wrong window, losing work is never pleasant. Fortunately, Windows offers several built-in utilities, and one of the most powerful is the Command Prompt (CMD). By learning how to Recover Unsaved Files with CMD Prompts, users can often bring back their important documents without spending money on expensive data-recovery services. This article explains, in clear and simple language, how CMD can be used for Windows file recovery, outlines its strengths and limitations, and introduces recover files with WinfrGUI as a friendlier alternative for anyone who prefers a point-and-click approach. Readers who need extra guidance are encouraged to open the winfr help center at any time.
What Is the Command Prompt (CMD)?
The Command Prompt is a text-based interface built into every version of Windows. Instead of clicking on icons, the user types short commands, and Windows performs the requested action. Although it may look intimidating at first, CMD is surprisingly reliable for tasks such as CMD file recovery, system diagnostics, and network troubleshooting. Because it interacts directly with the operating system, CMD can reach files and folders that regular programs cannot.
Core Functions of CMD in File Recovery
- Search for recently deleted or unsaved files using built-in utilities.
- Restore previous versions of documents through Shadow Copies.
- Copy data from corrupted drives to safe locations.
- Launch advanced tools such as Winfr file recovery commands.
Step-by-Step Guide – Recover Unsaved Files with CMD Prompts
Below is a practical, numbered walkthrough that shows exactly how to Recover Unsaved Files with CMD Prompts on Windows 10 and Windows 11. Each step uses plain English and avoids unnecessary jargon. The guide assumes the user has basic familiarity with opening programs, but no prior experience with CMD.
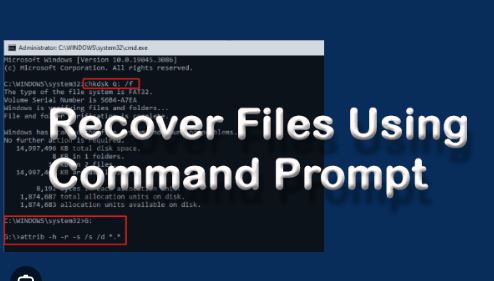
Step 1: Open Command Prompt as Administrator
- Click the Start button.
- Type “cmd”.
- When “Command Prompt” appears, right-click and choose “Run as administrator.”
- Confirm any User Account Control prompt by selecting “Yes.”
Step 2: Determine the Drive Letter
Before typing any recovery command, the user must know which drive contains the missing file. Common examples:
- C: for most personal documents
- D: or E: for external USB drives
To list all drives, type the following and press Enter:
- wmic logicaldisk get name
Step 3: Check for Previous Versions with Shadow Copies
Windows sometimes keeps automatic backups called “Shadow Copies.” The user can query these copies with a single CMD command. Replace “C:” with the correct drive letter and “Users\YourName\Documents” with the actual folder path:
vssadmin list shadows /for=C:
If results appear, note the “Creation Time” of the most recent shadow copy. Then proceed to Step 4. If no shadow copies are listed, skip to Step 5 for an alternative method.
Step 4: Recover a File from a Shadow Copy
- Create a new folder on the desktop called “Recovery.”
- Return to CMD and type (all on one line):
mklink /d C:\RecoveryLink \\?\GLOBALROOT\Device\HarddiskVolumeShadowCopy1\Users\YourName\Documents
Replace “1” with the appropriate shadow copy number found in Step 3, and adjust the path to match the missing file.
- Open File Explorer, navigate to C:\RecoveryLink, and copy the needed file to a safe location.
- Delete the symbolic link afterward by typing:
rmdir C:\RecoveryLink
Step 5: Use the Windows File Recovery Tool (Winfr) via CMD
When Shadow Copies are unavailable, the built-in Winfr file recovery tool can scan the drive for deleted or unsaved data. Starting with Windows 10 version 2004, Winfr is included by default.
- In CMD, type the following generic command structure:
winfr source-drive: destination-drive: /regular /n *.docx
- Replace “source-drive” with the letter of the drive that held the missing file.
- Replace “destination-drive” with a different drive where recovered files will be saved.
- The “docx” filter tells Winfr to look only for Word documents; users may substitute “xlsx” for Excel, “pptx” for PowerPoint, or for everything.
- Press Enter. A prompt appears asking for confirmation; type “y” and press Enter again.
- Wait for the scan to finish. The duration depends on drive size.
- Once complete, open the destination drive and look for a folder named “Recovery_[date-time].”
Step 6: Verify Recovered Files
Open each recovered file to confirm it contains the expected content. If the file is still corrupt or out of date, rerun Winfr with the “/extensive” switch instead of “/regular,” which performs a deeper scan.
Practical Example – Recovering an Unsaved Excel Sheet
Imagine the user was working on an Excel budget file when the laptop battery died. After restarting, the file is missing from Excel’s recovery pane.
- Open CMD as Administrator.
- Type:
winfr C: D: /regular /n *.xlsx
- After the scan, a folder “Recovery_2025-08-28_10-30-20” appears on the D: drive.
- The user finds the file “Budget_August.xlsx,” opens it, and confirms the latest changes are intact.
Limitations of CMD-Based File Recovery
While CMD is powerful, it is not perfect. Users should understand the following constraints:
- Overwritten Data Cannot Be Recovered: If Windows has already written new data over the clusters that stored the unsaved file, even the best CMD commands will fail.
- Limited Support for Older Windows Versions: Windows 7 and 8 do not include the Winfr tool. Users on these systems must rely on Shadow Copies or third-party utilities.
- Typographical Errors Can Cause Harm: A single incorrect letter in a CMD command may delete the wrong folder or format the wrong drive. Always double-check syntax.
- No Visual Feedback During Scanning: CMD shows only a simple progress percentage. Users cannot preview files until the scan ends.
A Simpler Alternative – recover files with WinfrGUI
For users who find Command Prompt daunting, recover files with WinfrGUI offers a graphical, point-and-click interface built on top of the same Winfr file recovery engine. Instead of memorizing commands, the user selects drives and file types through intuitive menus. Key advantages include:
- Visual previews of recoverable files before starting the scan.
- Drag-and-drop destination folders.
- One-click resume after interruptions.
- Built-in tutorials that encourage users to open the winfr help center if questions arise.
Installation Steps
- Visit the official website https://www.winfr.org/.
- Click “Download WinfrGUI.”
- Run the installer and follow on-screen instructions.
- Launch the program, choose the source and destination drives, select file types, and click “Start Recovery.”
When to Choose WinfrGUI Over CMD
- The user is uncomfortable with command-line interfaces.
- The recovery scenario involves multiple file types that would require lengthy CMD filters.
- The user wants real-time progress details and thumbnails.
Whenever guidance is needed, simply open the winfr help center from within WinfrGUI’s menu bar. The help center contains video tutorials, FAQs, and direct links to community forums.
Final Thoughts
Losing an unsaved file can feel overwhelming, yet Windows provides dependable tools to reverse the damage. By following the instructions above, anyone can Recover Unsaved Files with CMD Prompts without advanced technical knowledge. However, for a smoother experience especially when time is short or stress levels are high, users should consider the convenience of recover files with WinfrGUI. Its friendly interface brings the same powerful Windows file recovery engine to users who prefer not to wrestle with command lines. For extra tips, troubleshooting, and personalized guidance, readers should open the winfr help center right now and discover how effortless file recovery can be.